
ADOBE PHOTOSHOP
by sumit kumar

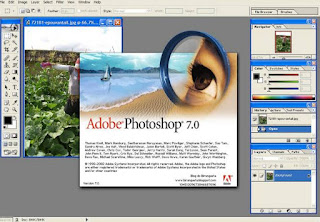
Introduction
Adobe Photoshop is a graphic program that has set the standard for image manipulation. One of the excellent feature of photoshop is tool in the tool box. That places all the drawing tool in left next to the picture so that you can use them quietly and easily. You also use to create originals.
.jpeg)
Starting Photoshop
Click start button highlight programs and choose adobe and click Adobe Photoshop.
Creating new file or image :
Click the file menu, choose new.....
Alternately press CTRL + N together them press enter.
Opening file : file menu > open file.
Alternately > CTRL + O, press enter
Saving file : file menu > save/save as
Alternately : curls (save), press enter CTRL + shift + S (save as) press enter.
Menu
The menu bar in photoshop 7 consist of menus in the work area. Each menu in the bar reprehensible a group of commands that can enable you to make transformations to all or part of an image and manipulate file. These are given left on the top of the screen. If there is any right found arrow of the menu command.
.jpeg)
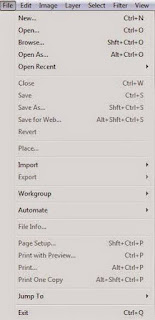
File Menu
File menu is the most used from all menus which allows you to work with file. It is used for opening drawing, saving, importing, exporting, printing and quitting the files.
.jpeg)
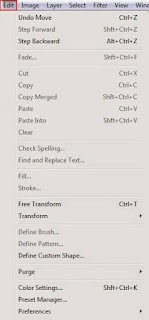
Edit Menu
Edit menu used for editing purpose cut, copy, paste, undo, clean are some of the editing command and in the menu.
.jpeg)
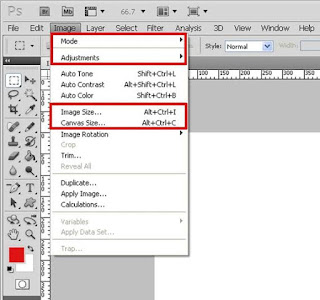
Image Menu
Image menu has option to adjust the colous and the lightness and the brightness of the image.
.jpeg)
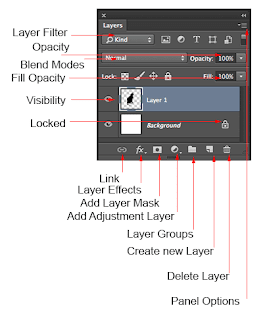
Layer Menu
Layer men is used to work on various layers. This enables you for creating layers, deleting layers, effect and grouping the layer menu open dialog boxes to create new layers. It also has many commands to make and work with several layers.
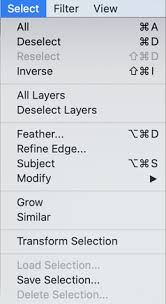
Select Menu
Select menu has options that let you modify areas you have selected. You can grow or shrink the selected area by as many pixel as you desire.
Filter Menu
Photoshop filter menu contains 101 filters. Divided into 14 sub headings. Some filter blur or sharpen image, some display it and some turn it into imitation paintings coloured pencil.
.jpeg)
View Menu
View menu is used to zoom in and out on t he picture. It also has commands governing rules, guides and grids and grids that enable you to measure and place object within the word area.
.jpeg)
Window menu shows and hides palettes.

Lasso Tool (L)
For a faster way to select. The lasso tool simply press the letter I on your keyboard laso tools makes a selection of selected pixels on the image. Polygonal lasso tool : makes from hand selection Magnetic lasso tool : snap to same kind of pixels.
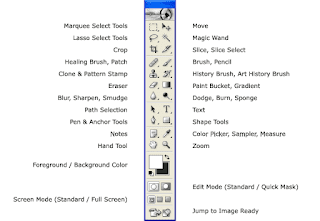
The magic wand tool (W)
The magic wand magic tool known simply as the magic wand is one of the oldest selection tool in the photoshop. Work of magic wand is to select the same kind of pixels in real time at once. We can set tolerance according to our need.
Crop Tool (C)
Cop tool is used to crop the imge in required size crop tool crops all the layer together.
Slice Tool (K)
The slice tool allows you to divide an image into smaller selection which fit together like a jigsaw but with straight edge.
Healing Brush Tool (J)
Healing brush creates pixels same as taken from the source by pressing ALT KEY and mouse left click. It is used to repair the image and to match the skin tone.
Brush or Pencil Tool (B)
Brush/Pencil tools create pixels of selection foreground colour. Brush tool is the most used tool in Photoshop and it play mor than one role in different condition. While pencil tool is not commonly used. Pencil creates on pixel at a time while brushes can be customized.
History Brush/Art History Brush (Y)
The art history bruh tool paints with stylized strokes using the source data from a specified state or snapshot. By experimenting different point style size etc.
Eraser Tool (F)
Eraser tool is used to erase the selected pixels. It also has background erase tool that deletes background.
Dodge/Burn/Sponge (D)
Dodge tool creates dodge pixels fades the image pixels, burn tool created the burn effect.
Path Selection Tool (A)
This constrains the path selection tool so that is oly works on advice layer.
Text Tool (T)
Text tool is most commonly used editing tool in Photoshop and DTP application software. It i used to write artistic and paragraph text in an image.
Pen Tool & Anchor Tool (P)
Pen tool is used to creat path on an image into make curved selection for cut-out image. Anchor tool is used to make or delete nodes in already created path.
Shapes Tool (U)
Shape tool is often used to create shapes given as present. Shape tool is most commonly used to make banners and online promotion advertisements. A shape tool creates a mask layer on the current layer that can be edited easily into other complex shapes.
Note Tool (N)
Note tool is used to create note on the image for remembering the key points and making notes for editing or publishing. Notes are not visible in your final image export.
Colour picker tool ( ALT LEFT CLICK ) : colour picker tool in the most important tool. Its selects the colour as foreground colour of the pixels it is clicked. Short key of colour picker is to hold ALT key and click on desired colour.
Hand Tool (H)
Hand tool is used to pan over a zoomed in image. Keyboard shortcut is to hold space bar and pan over the image by holding by are dragging the mouse.
Zoom Tool (Z)
Zoom tool is used to zoom in and out the image or pad file opened in photoshop.
Short cut method is :
CTRL + + = to zoom in
CTRL + - = to zoom out
CTRL + 0 = to return to original size
Foreground/Background Colour :
These two colour are selected by the user. Foreground colour applies with brush, type and shape. Background applies with eraser tool. Shortcut key to exchange colour: is x To set it on b/w is d.
Clone Stamp Tool (S)
The clone stamp tool takes a sample of an image. Which can be applied to another image or part of the same image. The pattern you can select this tool by pressing & from the keyboard.
Colour Models
A colour model is an orderly system for creating a whole range of colour from a small of primary colours these are types of colours model.
- Additive colour model
- Subtractive colour model
Additive Colour Model
In the additive colour model colour is created by combining coloured light sources in these primary colours. Red, green and blue (RGB) . This is the proces used for a TV or computer monitor.
Subtractive Colour Model
In the subtractive colour model, colour is created by combining coloured media such as paint or ink. That absorb or subtract some part of the colour spectrum of light and reflected the others back to the eye. Subtractive colour is the process used to crete colours in printing.
Colour Characteristics
A more intuitive way of describing colours. Colours is presented in hue, saturation and brightness (HBS).
HUE : hue is particular tone of a colour distinct from all others red, green, and blue are all hues. For examples the eye can discriminate between red and blue colour of equal intensity because of the different in hue.
Saturation
The saturation of a colour is the relative intensity or purity of the colour. Lowering the saturation of red hue will make the colour Lowering the saturation of red hie will make the colour look more patel or fumble.
Brightness
The brightness or lightness of a colour refers to the amount of black aded to the colour, making the colour appear darker. For example midnight blue or brick red would adding black to a particular hue.
RGB colour Model
The television monitor and camera hardware manufactures developed the RGB model to nue b used in the design of image capture devices.
television and colour monitors. The model is additive in that defferent intensities of red , green and blue (RGB) added to generate carious colours. This model is not suitable for image processing.
In equal amount
Red + Green + Blue = White
Red + Green = Yellow
Green + Blue = Cyan
Blue + Red = Magenta
CMYK Model
The cyan, magenta, yellow and black (CMYK) colour model is less applicable to multimedia production. This model is used in desktop publishing devices. It is a colour subtractive model and but used in colour printing devices only.
In equal amount
Cyan + Magenta + Yellow = K (Black)
Magenta + Yellow = Green
Yellow + Cyan = Green
Cyan + Magenta = Blue
File Format
There are many standards for image or graphic files. But they are all incomplete with each other. Mot of the multimedia programs can however loaded or sve a wide verity of graphic formats. In this suction we will introduce you to some of the more popular image formats.
GIF
- Gif stand for graphics interchange format.
- It is widely used on world wide (Internet).
- File size is comparatively smaller than other formate.
- Use only 256 colour.
- Can be used for moving picture.
- Files uses extension gif.
Disadvantages of GIF
- Low quality images
- Less colour representation
JPEG
- Jpeg stand for JOINT PHOTOGRAPHIC EXPERT GROUP
- It is used for on screen presentation like TV and computer monitors.
- Jpeg used bitmap images that create a very realistic experience.
- It is also small in size because used lossy compression technique.
- Jpeg used extension jpeg/jpg.
- It used RGB colour model and range of colour 2 of power 34.
Disadvantages of JPEG
Comparatively big file size that gif. Uses lassy compression for that some of the information losses. Doesn't support transparent background.
PNG
- PNG stands for portable network graphics.
- It is paid replacement of gif images.
- Uses 1 to 48 bit images
- Files size is large.
- Support transparent background.
- File uses extension. Png.
Disadvantage of PNG
Its's not free and need license to be used in any object.
File size is larger than others formate.
Still not so popular file format and doesn't supported by many multimedia platforms.
TIFF
Tiff stand for tagged image file format.
It is used in desktop publishing like printing and faxing.
Scanned images are converted into tiff.
It uses multiple colour model to generate colour.
File uses extension tiff.
Disadvantage of TIFF
It takes very large space in computer memory to be saved. Doesn't support by many platforms, can't be used on internet.
Other Important Topic :-
Some important 50+ full form about computer?
What is digital number system?
What is the input and output device?
Difficult word in this blog :-
Manipulation - चालाकी
Quietly - चुपचाप
Consist - निहित होना
Command - आज्ञा
Transformations - परिवर्तन
Exporting - निर्यात
Purpose - उद्देश्य
Adjust - समायोजित करना
Various - विभिन्न
Several - कई
Shrink - सिकुड़ना
Imitation - नक़ल
Grids - ग्रिड
Measure - मापना
Rectangular - आयताकार
Marquees - शामियाने
Tolerance - सहनशीलता
Together - साथ में
Straight - सीधा
Commonly - आमतौर पर
Customized - अनुकूलित
Free (BCA) course available in this blog by sumit kumar
Link : www.learnoversoftware.blogspot.com


0 Comments