
Presentation Part 3
by sumit kumar

Features of Computer - At Computer Knowledge
.jpeg) |
| Features of MS PowerPoint |
Insert Picture
We can insert a picture into the slides from the computer system the images are stored.
Here we see some steps to insert a picture into the slides....
- Goto Insert menu and click Picture (MS PowerPoint); or
- Goto Insert Tab; and click Picture tool in the Illustration group (MS powerPoint 2007/2010);
- In the Open file dialog, browse and locate the picture file and click to Insert button.
Insert Smart Art
Smart Art is a graphics tool used to represent text or paragraph graphically. It provides number of graphic operation to be inserted in the slides to represent different meanings. As we have discussed above it is a very interacting tool to represent graphics.
This tool is introduced since Microsoft Office 2007 applications and till. This is no more available in previous versions than this.
Here are the steps to insert a Smart Art graphics into the slides....
- Goto Insert tab; and click Smart Art tool in the illustration group; and
.jpeg)
- Choose a specific Smart Art graphic in the Smart Art dialog; and
- Click OK.
Here comes the type of Smart Art graphics to used in the slides or any Microsoft Office applications.....

Charts
We can insert Charts into the slides of the presentation. Whenever we need to represent data records into pictorial form then we need charts.
Here comes the details of charts used in the presentation....

Here are the steps to insert Charts into the slides in the presentation....
- Click Insert menu and click Charts (MS PowerPoint 2003)
- Goto Insert tab; and click Charts tool in Illustration group (MS PowerPoint 2007/2010); then
- Choose a type of Chart in the dialog; and
- Resize and scale the chart you choose on the Slide.
NOTE - This is the sample data record inherited by MS Excel worksheet.
Insert Photo Album
It is the feature of Microsoft PowerPoint which facilitates you to create an album of photos of your own. A PowerPoint photo album is a presentation that you can create to display your personal or business photographs. You can add effects that include attention- grabbing slide transitions, colourful backgrounds and themes, specific layouts, and more. After the pictures are in your album, you can add captions, adjust the order and layout, add frames around the pictures, and even apply a them to further customize the look of your album.
Here are the steps to create a photo album in Microsoft powerPoint....
- Goto Insert tab and click to Photo Album tool and click to New photo Album; and
- In the Phot Album dialog, click to File/Disk button under Album content and choose a bizzare of photos from your computer system; and
- Click Create button.
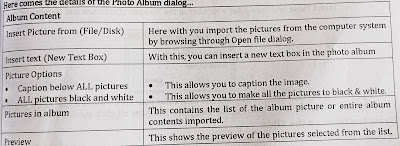
Here comes the details of the Photo Album dialog...

You can insert table in the slides of the Presentation same as Microsoft Word and Excel. Whenever we need to put the data in the tabular format in the slides of the presentation then we do it using the rich features of the Microsoft Office PowerPoint.
Here are the details.....
Steps creating a table on the slide: Select the slide that you want to insert the table into and then...
- Goto Insert tab and click Table tool in the Tables group ; and
Do one of the following...
- Move the pointer to select the number of rows and columns that you want, and then click.
- Click Insert Table, and then enter a number in the Number of columns and Number of rows lists.
- To add text to the table cells, click a cell, and then enter your text. To add a row at the end of a table, click the last cell of the last row, and then press TAB. After all, click outside the table.
Draw the table on the Slide
- Select the slide that you want to draw a table upon....
- Goto Insert tab, in the Tables group, click Table, and then click Draw Table then the pointer changes to a pencil.
- To defin the outer table boundaries, drag diagonally to the size that you want, and then drag to create the colomn and row boundaries.
- To erase a line from a cell, row, or column, under Table Tools, on the Design tab, in the Draw Borders group, click Eraser, or press and hold SHIFT then the pointer changes to an eraser.
- Click the line that you want to erase.
- When you finish drawing the table, click a cell, and then enter your text.
Configuring Table design
You can configure the designing of the table in the slide of the presentation. We can assign a different design to the table on the slides. Here are the details....

We have number of designing tools in the Microsoft powerpoint application to assign a kind of look ot the presentation.
Here are the details...
Changing/Setting Theme colour
In powerpoint on the Design tab, in the Themes group, click the document theme that you want ,or click More to see all available document themes.
Stay at Design Tab and as follows....
- To apply a predefined presentation theme, click a presentation theme that you want to use from the drop down list.
- To apply a custom presentation theme, click Browse for Themes option to browse and select the theme from your computer system or click More Themes on Microsoft Office Online to connect with internet and get a theme from Microsoft Office Official site.
Background Style
You can set background style as to fill background colour along with some background style presets. You can format background style with some easy steps detailed as follows...
Fill Background Colour
You can set a background colour with some given background style presets or configure the background with personalized colour as well as gradient and textures. Here are the steps....
- Goto Design tab and click to Background Style in the Background group to set a background style; or
- Click to Format Background command in the Background Style drop down; and in the Format Background dilog, stay at fill option in the left pane and click to check radio button of either Solid fill, Gradient fill or picture or texture fill; and
- Choose a colour under you want to fill and set the Transparency level by sliding the slider and click Apply as All button.
Set picture as Background
You can set a picture as background to the presentation. Here are the details to do so...
- Goto Design tab and click to Format background launcher button in the Background group; and
- Stay at Fill option in the left pane and click to Picture or texture fill radio button and click to file button under Insert From; and
- Browser and Select the picture from your computer System you want to set and click Open in the open file dialog and Apply to All in the format background dialog.
Slide Orientation
You can set the slide orientation for the layout of the slides to assign a kind of layout to be displayed. We can set the orientation in two ways whether to portrait or Landscape.
Here are the steps to assign an orientation to the slides in the presentation...
- Goto Design tab and click to Orientation tool and and select a kind of layout from the drop down list.
Adding Headers & Footers
To apply header and footer information to several but not to all slides, select the slides you want before starting this procedure. You can select them on the Outline tab or Slides tab in normal view, or in slide sorter view.
Goto View menu and click Header and Footer (MS PowerPoint 2003) then
- Click the Slide tab, and then select the options you want.
- To add an automatically updating date and time, under Data and time, click Update automatically, and select a date and time format. Or, to add a fixed date and time, click Fixed, and type a date and time.
- To add a number, click Slide number.
- To add footer text, click Footer, and type your text and Do one of the following..
- To add the information to the current slide or selected slides, click Apply
- To add the information to every slide in the presentation, click Apply to All.
Goto Insert tab ; and click Header & Footer in the Text group ; (MS PowerPoint 2007/2010); and then.
Click the slide tab, and then select the options you want.
To add an automatically updating date and time, under Date and time, click update automatically, and select a date and time format. Or, to add a fixed date and time, click Fixed and type a date and time.
To add a number, click Slide number.
To add footer text, click Footer, and type your text and Do one of the following...
To add the information to the current slide or selected slides, click Apply.
To add the information to every slide in the presentation, click Apply to All.
.jpeg)
NOTES - If you don't want the information to appear on the title slide, select the Don't show on title slide check box.
Add Headers and Footers to Notes, Handouts and the printed outline
Click the Notes and Handouts tab, and then select the options you want.
- To add an automatically updating date and time, under Date and time, click Update automatically, and select a date and time format. Or, to add a fixed date and time, click Fixed and type a date and time.
- To add page numbers, click Page Number.
- To add header text, click Header, and type your text.
- To add footer text, click Footer, and type your text.
- Click Apply to All.
Adding Transitions and Animations to the slides
Slide transitions are the animation - like effects that occur in slide show view when you move from one slide to the next. You can control the speed of each slide transition effect, and you can also add sound.
Adding the same transition to all slides in a slide show presentation.....
- In the pane that contains the Outline and slides tabs, click the slides tab; and
- Goto home tab, click a slide thumbnail; and now
- Goto Animations tab and in the Transition To This slide group, click a slide transition effect; or you can click the More button to see more transition effects, in the Quick Style list; and
- To set the slide transition speed, in the Transition To this slide group, click the arrow next to Transition speed, and then select the speed that you want.
- In the Transition To This slide group, click Apply to All button.
Adding different transitions between slides- Repeat the following process for each slide you want to add a different transition to....
- On the slides tab in normal view, select the slides you want to add a transition to.
- Goto slide Show menu and click Slide Transition;
- In the list, click the transition effect you want; or.
- Goto Animations tab and in the Transition to this slide group, click a slide transition effect; or you can click the More button to see more transition effects, in the quick styles list; and.
- Select different transition effects to different slides from the list.
Running and controlling a Slide Show
We can run and control a PowerPoint presentation with the rich tools of the Application. Here are the details.....
Running a Presentation
We can run the PowerPoint presentation with some easy available tools along with easy steps...
Open the PowerPoint Presentation file and goto slide show tab and do one of the following....
- Click to From Beginning tool in start slide show group to start the slide show from the beginning; or
- Click to From Current slide in the start slide show group to run from the current slide in the presentation; or.
- Click to custom slide show in the start slide show group to define the customized slide show; this generates a dialog to define the custo, slide show as follows....
- Click to new button in the dialog to launch the Define custom show dialog to set up the slide show
- In the define custom shows dialog, type the name of custom show and click to select a slide enlisted under slides in the presentation and click to Add button to add a slide in the custom show, you can even remove a slide up and down using Up buton and Down button; and finally click OK button to set the custom show.
Automating a Slide Show
By using a self- running presentation, you can communicate your information without a presenter.For example, you can set up a presentation to run unattended in a bothe or kiosk at a trade show or convertion, or you can send a CD with a self- running presentation to a client.
You can make most controls unavailable, so that your audience cannot make changes to your self- running presentation. Self- running presentations restart after they are finished and when they have been idle on a manually advanced slide for longer than five minutes.
Here are the steps to automate a slide show....
- Open the presentation file and goto Animation tab and stay in Transition To This Slide group and click to check Automatically After under Advanced Slide and mention the time interval in the text box next to Automatically After; and
- Click Apply To All button; now the presentation will take effect by automating as per time interval is set.
Setup slide Show
You can so setup for slides in the presentation that how it is going to run and perform.
Here are the steps to go for the setup....
- On the slide show tag in MS PowerPoint 2007/2010; and
- Click Set Up Slide Show under Set Up group
- In the dialog, specify the setting for the slides; and click OK
.jpeg)

Rehearse Timings
You can rehearse your presentation to make sur that it fits with in a certain time frame. While you rehearse, use the slide timing feature to record the time that you need to present each slide, and then use the recorded times to advance the slides automatically when you give your presentation to your actual audience.
Goto slide show taab and click rehearse Timings in the setup group. The rehearsal toolbar appears, and the slide time box begins timing the presentation.
While you time your presentation, do one or more of the following on the
Some Important Topic:-


0 Comments